In this tutorial I show you how to change the background of an image using Photoshop CC. I actually use 3 techniques for the background removal process and they involve the following tools:
- Background eraser tool.
- Quick selection tool.
- Eraser tool.
Note that I used the regular eraser tool twice with different opacity settings. You can see the entire process in the video below:
Can’t view the video? Watch it on YouTube
Below are the steps that I used to change the background of this image. Note that the settings have a lot to do with your image and they vary. Below I will explain how this works.
Erase the old background:
Open the image that you want to change the background of in Photoshop and if the layer is locked, simply unlock it by double clicking on the layer in the layers window.
Next use the background eraser tool around the hair. The background eraser tool can be found in the tools window and looks like this:

I then used the following settings:
Sampling once which can be found in the top toolbar. The icon looks like this ![]()
I then used contiguous for limits which looks like this:
![]()
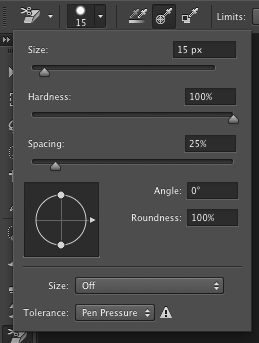
As for the tolerance, I used 11% but this should be changed depending on your image. A lower tolerance level basically erases less since it is easier for Photoshop to distinguish the difference between the background and the foreground. I also had “protect foreground color” unchecked and the settings looked like this:
![]()
As for the brush size, I used 15px and the rest of the setting looked like this:

I then simply clicked my mouse along the hair erasing as much of the background as possible. This is how the process looks:

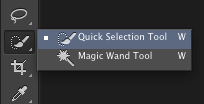
After erasing along the hair, I used the quick selection tool to clean up around the sleeves and hands. The quick selection tool is also located in the tools window and looks like this:

When using the quick selection tool, hold down your left mouse button and drag along the lines of the foreground where the background meets.
Note that you can release the left mouse button and continue again at anytime. When you go to far in, you can subtract from the selection by holding down the keyboard “option” key on a Mac or “alt” key on a Windows computer while holding down the left mouse button and dragging.
When you subtract, you basically just drag in the opposite direction.
When you want to add to the selection again, you simply let go of the “option” or “alt” key, release the left mouse button and then press the left mouse button and drag again to start adding.
In Photoshop CC and I believe in other newer versions of Photoshop, the tip of your brush turns to a plus (+) sign when you add and to a minus sign (-) when you subtract.
The process looks like this:
Adding to the selection

Subtracting from the selection

Note how I subtracted around the fingers because the quick selection tool went too far in.
After you have finished selecting the entire area, simple clear the selection by going to “edit > clear” in the top toolbar or use the shortcut on your keyboard.
Afterwards simply use the eraser tool to erase the rest of the background while making sure to stay away from the foreground that you want to keep. The eraser tool looks like this:
![]()
Change the old background with the new one:
Now you can open up your new background in Photoshop. If the layer is locked, you will want to unlock it by double clicking on it in the layers window.
Then select the image with the rectangular marquee tool ![]() (simply hold the left mouse button and drag while making a selection around the image), go to “edit > copy” in the top toolbar or use the shortcut on your keyboard.
(simply hold the left mouse button and drag while making a selection around the image), go to “edit > copy” in the top toolbar or use the shortcut on your keyboard.
Then go to the image that you just erased the background of and paste the new background by going to “edit > paste” or by using the paste shortcut on your keyboard.
Then in the layer window, move the background layer beneath the foreground layer. It should look like this:

Now take the move tool and position the background as needed. The move tool looks like this: ![]()
I then took the eraser tool and changed the opacity level to 30% so that I could clean the excess around the hair that the background eraser tool left behind. Just be sure to take it easy because if you erase too much, you’ll end up erasing the parts that you want to keep. If the opacity is too high, simply lower it.
![]()
Here are the before and after images.
Before:

After:

