One thing that really annoys me is when people take images that I’ve worked hours to take. I had this happen on my site as well as on marketplaces that I’ve sold on. In reality, people have even tried selling items that I knew they didn’t have because I had exclusive rights to them. Yet, that still didn’t stop them from using my photos…
Well, in this tutorial I’ve decided to show people how to use Photoshop to watermark their images. While this won’t necessarily stop other sellers from using your photos (believe me, I’ve had people use my watermarked images) it will at least let buyers know who the real McCoy is. Below you can see my video tutorial but I have a written version beneath it…
Can’t view the video? Watch it on YouTube
Let’s start by opening the picture that we want to add a watermark to. In the layer window, you will want to make sure that your layer is unlocked.
An unlocked layer looks like this:

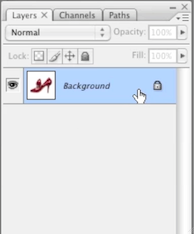
While a locked layer looks like this:
Next you will want to create a new layer. A new layer can be created using the this icon: ![]() which is locate in the layers window. If this window is missing, simply go to the Photoshop toolbar at the top, hover over “Window” and make sure “Layers” is selected.
which is locate in the layers window. If this window is missing, simply go to the Photoshop toolbar at the top, hover over “Window” and make sure “Layers” is selected.
Next right click on the text icon in the Photoshop toolbar and make sure that “Horizontal Type Tool” is selected. This should look like this:

Now place your mouse over the image that you want to add text to, click on it and type your text. Note that you can adjust the position, size of the text, color, font type, style etc.
After you’ve positioned your text as desired. You can adjust the opacity by selecting the text layer and dragging the bar to the desired percentage. This looks like this:

I typically shoot for 50% and lower in order to keep my main image from looking distorted.
Adding an image logo as a watermark
To use a logo as a watermark, simply open the image that you’d like to add to your main image and unlock it. If the background of your logo isn’t transparent, you’d want to remove the background before proceeding.
Next drag the unlocked layer to the main image. Doing this should display a new layer in the layer window. It should look something like this (Layer 1 being the logo layer — keep in mind that the name varies):
![]()
Now simply adjust the opacity of that layer the same way that we adjusted the opacity of our text.
Make your logo grayscale
Sometimes a colorful logo can be a bit much or clash with your main image. If this is the case, you can covert the logo to grayscale prior to adding it to your main image. This can be done by selecting the logo in the layer window and going to “Image > Mode > Grayscale” in the Photoshop toolbar at the top. After converting the logo to grayscale, drag it to the main image as we did earlier with our unmodified logo.
At this point you should have your new watermarked image ready. My finished image looks like this (I used an opacity of 20%):

Watermarking images in Photoshop CC and other newer versions
While the method of watermarking images in newer versions of Photoshop remains the same, I figured I’d shoot a video which shows you how it all looks in newer versions such as Photoshop CC. In this video I only show you how to add text to your image.
Can’t view the video? Watch it on YouTube