In this tutorial I figured I’d show people how to blend two images which have backgrounds that are similar in color. In such situations this a technique worth knowing because it’s easier and faster blending an image with a background than it is changing the background of an image in Photoshop.
In the video below you can see how I did it and beneath the video, you will find the written tutorial. Note that while I am using Photoshop CC for this tutorial, older versions such as Photoshop CS6 and some other older versions, will also work.
Can’t view the video? Watch it on YouTube
Prepare the canvas:
Open up the image that you’d like to merge with another image. Keep in mind that this is the image that will act as your background. After opening the image, unlock the layer if it’s locked.

Give the layer a name or leave it on default. In the video, I left it on the default name.

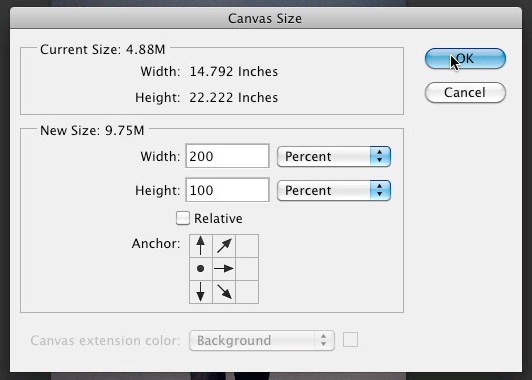
If your image doesn’t have enough empty space to fit in another image, simply enlarge the canvas. In the video I had to make the canvas wider. I did this by going to “image > canvas size”.

Enter in the new size of the canvas. In the video to make it wider, I entered 200 percent for the width and left the height the same. As for the anchor, I clicked on the left arrow because I wanted the left side preserved and only the right side widened.
Note that these measurements don’t have to be exact because you can always crop the image later. Rule of thumb, always go larger in size.
Below you can see how my canvas looked after I made it wider.

Paste the second image into the canvas:
Now open the image that you want to paste into the canvas and click the rectangular marquee tool icon in the left tool bar which looks like this ![]()
Now select the image using the rectangular marquee tool.

Now go to “edit > copy”.

Go to the image that will serve as the background and go to “edit > paste”.

After I pasted my image, it looked like this:

I then enlarged the image by scaling it. I went to “edit > transform > scale”.

To preserve the aspect ratio of the image, I held down the shift key on my keyboard while pressing and holding down my left mouse button and dragging. After positioning the image where you want it, simply double click on the image for the changes to take effect.

Erasing away areas in the image that you don’t want:
Now click on the brush tool icon in the left toolbar which looks like this ![]()
Now adjust your brush size to what works best for you. I used a soft round bush on the image.

Now select the top layer in the layers window and click on the “add layer mask” icon at the bottom which looks like a rectangle with a circle in the middle.

Now click on the “set foreground color” icon in the left toolbar to choose a paint color ![]()
In the video, I chose black paint which is the hex color code #000000.

Now paint away the areas which are close to the parts of the image that you want to keep. Just try not to paint too close to the areas that you want to keep because on those areas we need to lower the opacity so that they blend better with the background.

Restoring areas that you accidentally erased:
If you erase away areas that you want to keep, simply click on the “set foreground color” icon ![]()
And choose white paint. The hex color code for white is #FFFFFF.

Then simply paint over the areas that you want to restore as shown below:

If you’d like to reposition your top image, simply click on the move tool icon in the left toolbar and move it to the desired location ![]()
In the video, I decided to move the picture of my female model closer to my male model as shown below:

Blending the two images together:
Simply grab your brush tool again ![]()
And lower the opacity of the brush and select the “set to enable airbrush capabilities” icon since this allows you to control the paint flow based on how long you keep the left mouse button pressed while painting.

Click the set foreground color icon again ![]()
Choose black paint as shown in the image below:

Now simply paint over the areas that you want to remove. As you can see in the image below, this is the technique that I used when I started getting closer to the parts of the image that I wanted to keep.

Since there will be areas of the image left over due to the low opacity, we will need to blend those parts away by raising the opacity level a bit higher. In the video, I had the opacity at 90% which worked great for blending the top image with the background.

As you can see, it all looked pretty good except that I needed to get closer to the dress. So I erased a little more by the dress… Since I erased a little too much by the arm and by the feet, I decided to restore those areas.

So to restore the areas, I used a smaller brush head because I didn’t want to restore too much.

I then changed my paint to white once more so that I could restore the arm.

And painted over the arm.

I then selected the crop tool from the left toolbar ![]()
And cropped the image to my liking.

Once completed, my image looked like this:
