While a simple product may sound simple, it’s actually still more advanced than I initially thought that it would be. For example, you can even add buy options such as sizes, colors etc. When I first heard about simple products, I didn’t realize this was possible and thought that only configurable products offer that option.
There are actually many other features and in the video below I go over many of them:
Can’t view the video? Watch it on YouTube
To start simply go to “Catalog > Manage Products” and then click on the “Add Product” button on the top right of the page.
Next select an ‘attribute set’. For more details on attributes, you can take a look at this tutorial.
Select ‘simple product’ for ‘product type’ and click the ‘continue’ button.
Enter general information
Once on the general page, enter the name of your item in the ‘name’ field.
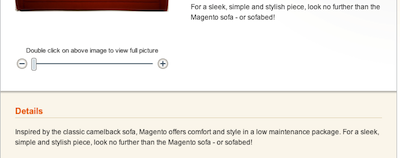
In the ‘description’ field, enter a description. The description that you enter in this field will show up in the details section of your product view page which looks like this:
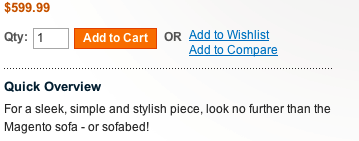
As for the ‘short description’ the text that you enter there, it will show up in the overview section which looks like this:
As for ‘SKU’, this is the stock-keeping unit value. In the video I enter ‘1’ in this field. Remember to enter a unique value for each item.
For ‘weight’ enter either a whole number or a decimal. I entered ‘1’ for 1 pound.
In the ‘set product as new from date’ and ‘set product as new to date’ fields, you can select the corresponding dates that you’d like for the item to be considered new or you can leave these fields blank.
For ‘status’, you’ll want to make sure that the value is set to ‘enabled’ if you want the item to be available for purchase on the site.
Select your ‘tax class’ using the dropdown menu. For more details on this, see my tutorial on Magento tax configuration.
As for the ‘url key’, this is the URL path of the product view page. I typically enter the name of the item in this field. As a best practice, I recommend keeping the value lowercase and only entering letters, numbers, underscores (_) and dashes (-).
For visibility, select where you’d like your item to show up. In the video, I select ‘catalog, search’ because I want my item to show up on category pages as well as search results pages.
If you’d like, you can select a country from the ‘country of manufacturer’ dropdown list.
Once finished entering in the general details, click the ‘save and continue edit’ button in the top right and go to the ‘prices’ page.
Enter pricing
On the pricing page, be sure to enter the ‘price’ of your item because it’s required.
If you’d like to enter a group price you can enter it by click the ‘add group price’ button. For example, if you have a wholesale customer group, you can enter in the wholesale price for those customers here.
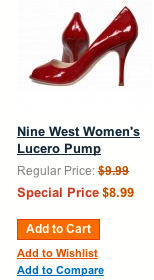
In the ‘special price’ field you can offer the item at a lower price than the price you entered in the ‘price’ field. When you do this, the regular price is crossed out and the special price is shown like in the picture below:
You can even decide for how long the item will be offered at the special price by entering a start date in the ‘special price from date’ and end date in the ‘special price to date’ fields.
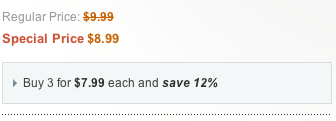
If you’d like to offer the item at a tiered discount, you can by clicking the ‘add tier’ button. For example, if you can enter ‘3’ for the quantity and ‘7.99’ for the price, it would indicate that the customer must purchase 3 of those items in order to get them for $7.99 each. You can even offer the items at the set price to a specific customer group by only selecting the groups that you’d like to offer the price to.
Here’s how this would look on the product view page:
In the apply ‘MAP’ (minimum advertising pricing) section, you can select “Yes” or “No”.
If you select “Yes” for ‘MAP’, you can also select a value for ‘display actual price’. For example, if you select ‘in cart’, the customer will see the actual price after they’ve added the item to their cart.
In the ‘manufacturer’s suggested retail price’ field, you can enter the display price for customers prior to adding the item to their cart. This would look like this on the product view page:
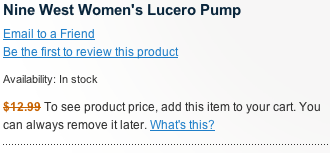
Note that you must enable MAP. You can do this by going to: “System > Configuration” , then go to the sales section in the left column and click the ‘sales’ link and then expand ‘minimum advertised price’ to change the settings.
Click the ‘save and continue edit’ button in the top right and go to the ‘META information’ page.
Meta information
Here you will need to populate each field with the corresponding values. If you are not familiar with META tags, this article covers the topic pretty well. Note that you should not enter any HTML in these fields.
Click the ‘save and continue edit’ button in the top right and go to the ‘Images’ page.
Images
On this page you can upload images for your item. Note that I wasn’t able to upload images after installing Magento because I was missing Flash. If you run into the same problem, you can download Flash here.
Remember that you can upload more than one image and also set the sort order for the images using the ‘sort order’ field.
Enter a ‘label’. This is used to describe the image so be sure to enter relevant text and try to keep it short.
You can decide where the images are displayed using the radio buttons which are positioned in the columns: ‘base image’, ‘small image’, ‘thumbnail’.
It’s important that you specify which image will be used for those three types of images because if you don’t, your products will be listed without images.
Recurring profile
If you’d like to offer your customer a subscription or other type of auto-billing plan, you can do this by going to ‘recurring profile’.
Design
Here you can enter a specific design for the item that you are listing.
Gift Options
If you select “Yes” for ‘allow gift message’, your customer will be able to enter a gift message during checkout.
Inventory
On this page, you will want to enter a number in the ‘qty’ field and make sure that ‘stock availability’ is changed to ‘in stock’ because if it’s not, your item won’t be visible in the store.
You can change the values of the other fields as you please. Note that the ‘config settings’ are set in “System > Configuration > Catalog > Inventory”.
Categories
Here you will want to select a category or categories for the item. For my tutorial on creating categories for more information.
Related products, up-sells, cross-sells
To set these up, see my tutorial on cross promoting items.
Product reviews, product tags, customer tagged product
If you have content for these sections, you’re going to want to populate these pages with that relevant content.
Custom options
Here you can specify custom options by clicking on the “add new option” button. You can select the input type, whether the a value is required, sort order and more.
In the video I create a dropdown menu for ‘size’ and add rows with the sizes ‘6’, ‘7’, ‘8’ and ‘9’. The menu looked like this on the product view page:
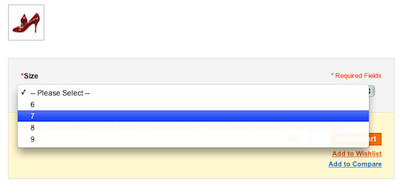
Since I made the option menu a requirement, customers will have to choose a size prior to placing their order. Of course, you can create other options, so it’s not limited to size.
Save your product
When finished populating all the required and desired fields, click the “Save” button in the top right to save and list your product.
